Cameras Telescopes

Connecting QHY268C/OAG To FSQ85 (none reduced) With An All-Threaded Connection

I discuss how to connect the QHY268C and QHYOAG-M to the FSQ85 with an all threaded connection as opposed to push-fit type

Introduction

I’ve bought a QHY268C colour CMOS camera and a QHYOAG-M as discussed in my post here.  As I explain in that post, my intention is to connect this up to my Takahashi FSQ85 “BabyQ” and make it an extensible system so that with easy and minor changes I can also connect the camera/OAG assembly to my Williams Optics Redcat 51, Samyang 135mm lens and maybe other optical systems (although its primary use will be on the FSQ85).  I also explain in that post how to configure the QHY268C and the OAG assembly such that both camera and guide camera can both reach focus simultaneously by “padding” out the camera side of the OAG with about 13mm of spacers between the OAG and the camera in order to get both cameras to simultaneously focus.

I now needed to determine a way  to mount the OAG-QHY268C assembly via a threaded method to the FSQ (and Redcat).  I do not like the 2″ barrel compression method of attaching expensive camera assemblies to telescopes for imaging purposes (fine for visual).  Your mileage may vary but in my opinion they are risky at best and can introduce tilt into the optical train.  I have had them fall out before (fortunately caught by the USB and power cables).  So in the context of this discussion it has to be a threaded method of attachment and furthermore this method must allow for the insertion of a 2″ filter.  I need to use a 2″ IDAS light pollution filter in the imaging train because of my backyard Bortle 5 suburban skies so I needed to figure this out. Furthermore, this filter must be easily and readily changeable – possibly when set up at night – since I have plans to use this camera with a narrowband filter such as the Optolong L-Extreme.

Bear in mind when considering filters that even though the QHY268C is a OSC camera, there is nothing to prevent you from using a filter wheel between the camera and the OAG.  This FW can be populated with an LDAS LP filter and an L-Extreme (and others).  It would also serve to “pad” the camera back from the OAG to achieve the objectives I outlined in my previous post. However, for now I have exhausted the budget and do not wish to use a filter wheel.  So I need to install a filter drawer into the imaging train, and I needed to figure out how.

NOTE:  This mechanism I describe applies to the Takahashi FSQ85.  I can’t comment if it works on other Takahashi telescopes. One tends not to have multiple Takahashi FSQ telescopes ($$$$$$$) ! 🤣

SECOND NOTE: The method I describe is the telescope at native focal length without the FSQ 0.73 reducer.  I no longer use the focal reducer with this telescope and sold it.

FSQQHY268C threaded connection
Labelled Adapter for Threaded fit to FSQ85

The Crazy And Expensive World Of Takahashi Adapters.

As owners of Takahashi refractors will be very aware, if you want an all-threaded method of connection then several costly adapters are needed to get the telescope to focus with a camera.   The focal point of the telescope is a quite a distance from the rear of the focuser housing – about 200mm or so in my example. Therefore, to get the camera to focus this space must be made up by racking out the focuser and also with adapters.  The stock focuser with the FSQ85 does indeed rack out a long way, but not enough to make up for the 200mm distance to the focus point.  It is never a good idea to have the focuser racked out too far because doing so can introduce a slight flop and sag in the focuser, a bad thing when imaging since the imaging sensor in the camera will not then be orthogonal to the imaging circle.  With that in mind, the adapters I choose are such that the focuser is 80% into the focuser housing to minimise any flop risk.

As an aside, my FSQ85 example is from 2012 and has a good focuser but I have heard reports that the focuser on more recent examples are not as good and cause issues in the corners of the image.  Indeed, I have heard where people have upgraded to a Starlight Instruments focuser at a cost of £700, rather a lot to have to pay on top of the already eye-watering cost of Takahashi FSQ ownership! 😱 

FSQ_QHY back focus
Distance to the focal point on FSQ85

Please refer to the top picture.  The first adapters I have used are two Takahashi TKA31581 Vari-Ring Spacers, each of which adds 17mm to the imaging train.  This has a 72mm male telescope side thread and ends in a 72mm female camera side.    These adapters are not too expensive, about £21 each in the UK.  So with two of them in series I am adding 34mm to the imaging train.  You can add as many of these as you wish to get the back focus for a particular situation, hence the term “vari” in the adapter name.

As an aside, Instead of using the two adapters I used, you could instead use the Takahashi Auxiliary Extender (TKA23250) which extends the M72 female threads at the end of the focuser tube and presents a female M72 thread. This adds 50mm to the imaging train.

The next part in the imaging train is the CA35 TSA102 (TKA23201) adapter whose purpose is to drop the Takahashi 72mm thread from the auxiliary extender down to a more standardised 54mm thread.  This adapter has a 72mm male thread on the telescope side and drops the aperture down to M54 female so that common accessories can be used. No other manufacturer that I know of uses M72 other than Takahashi so we need a way to convert from the Takahashi M72 to an “ordinary” system!  The CA35 adapter is what does this and it also adds another 25mm to the imaging train.  This adapter is more expensive at about £60.  I told you these adapters were expensive !!!!!

NOTE:  I already owned the above adapters a decade before I bought the QHY268C since most FSQ85 users will own them for other imaging requirements.  However, they are additional to the purchase of the scope itself.  Takahashi ownership is an expensive business!

Connecting To The Back Of The CA35 With The ZWO Filter Drawer (and rationale for going this route)

The adapters I explained in the paragraphs above are quite “standard” in the context of setting up a FSQ85 all-threaded imaging system.  I now needed to work out how to connect the QHYOAG-M to the CA35 with a filter drawer.  I also still needed to make up some distance in the imaging train to get to the 200mm or so needed to get the cameras to focus because even with the above adapters it is still short of the required distance to get the camera to focus.

ZWO_Filter drawer male side
ZWO M54 Male side - bottom view
ZWO_Filter drawer female side
ZWO M54 Female side with M54>M48 adapter on the table
ZWO_Filter drawer in the middle
Top view of the filter drawer
ZWO M54 Filter drawer
Filter drawer as supplied in packet

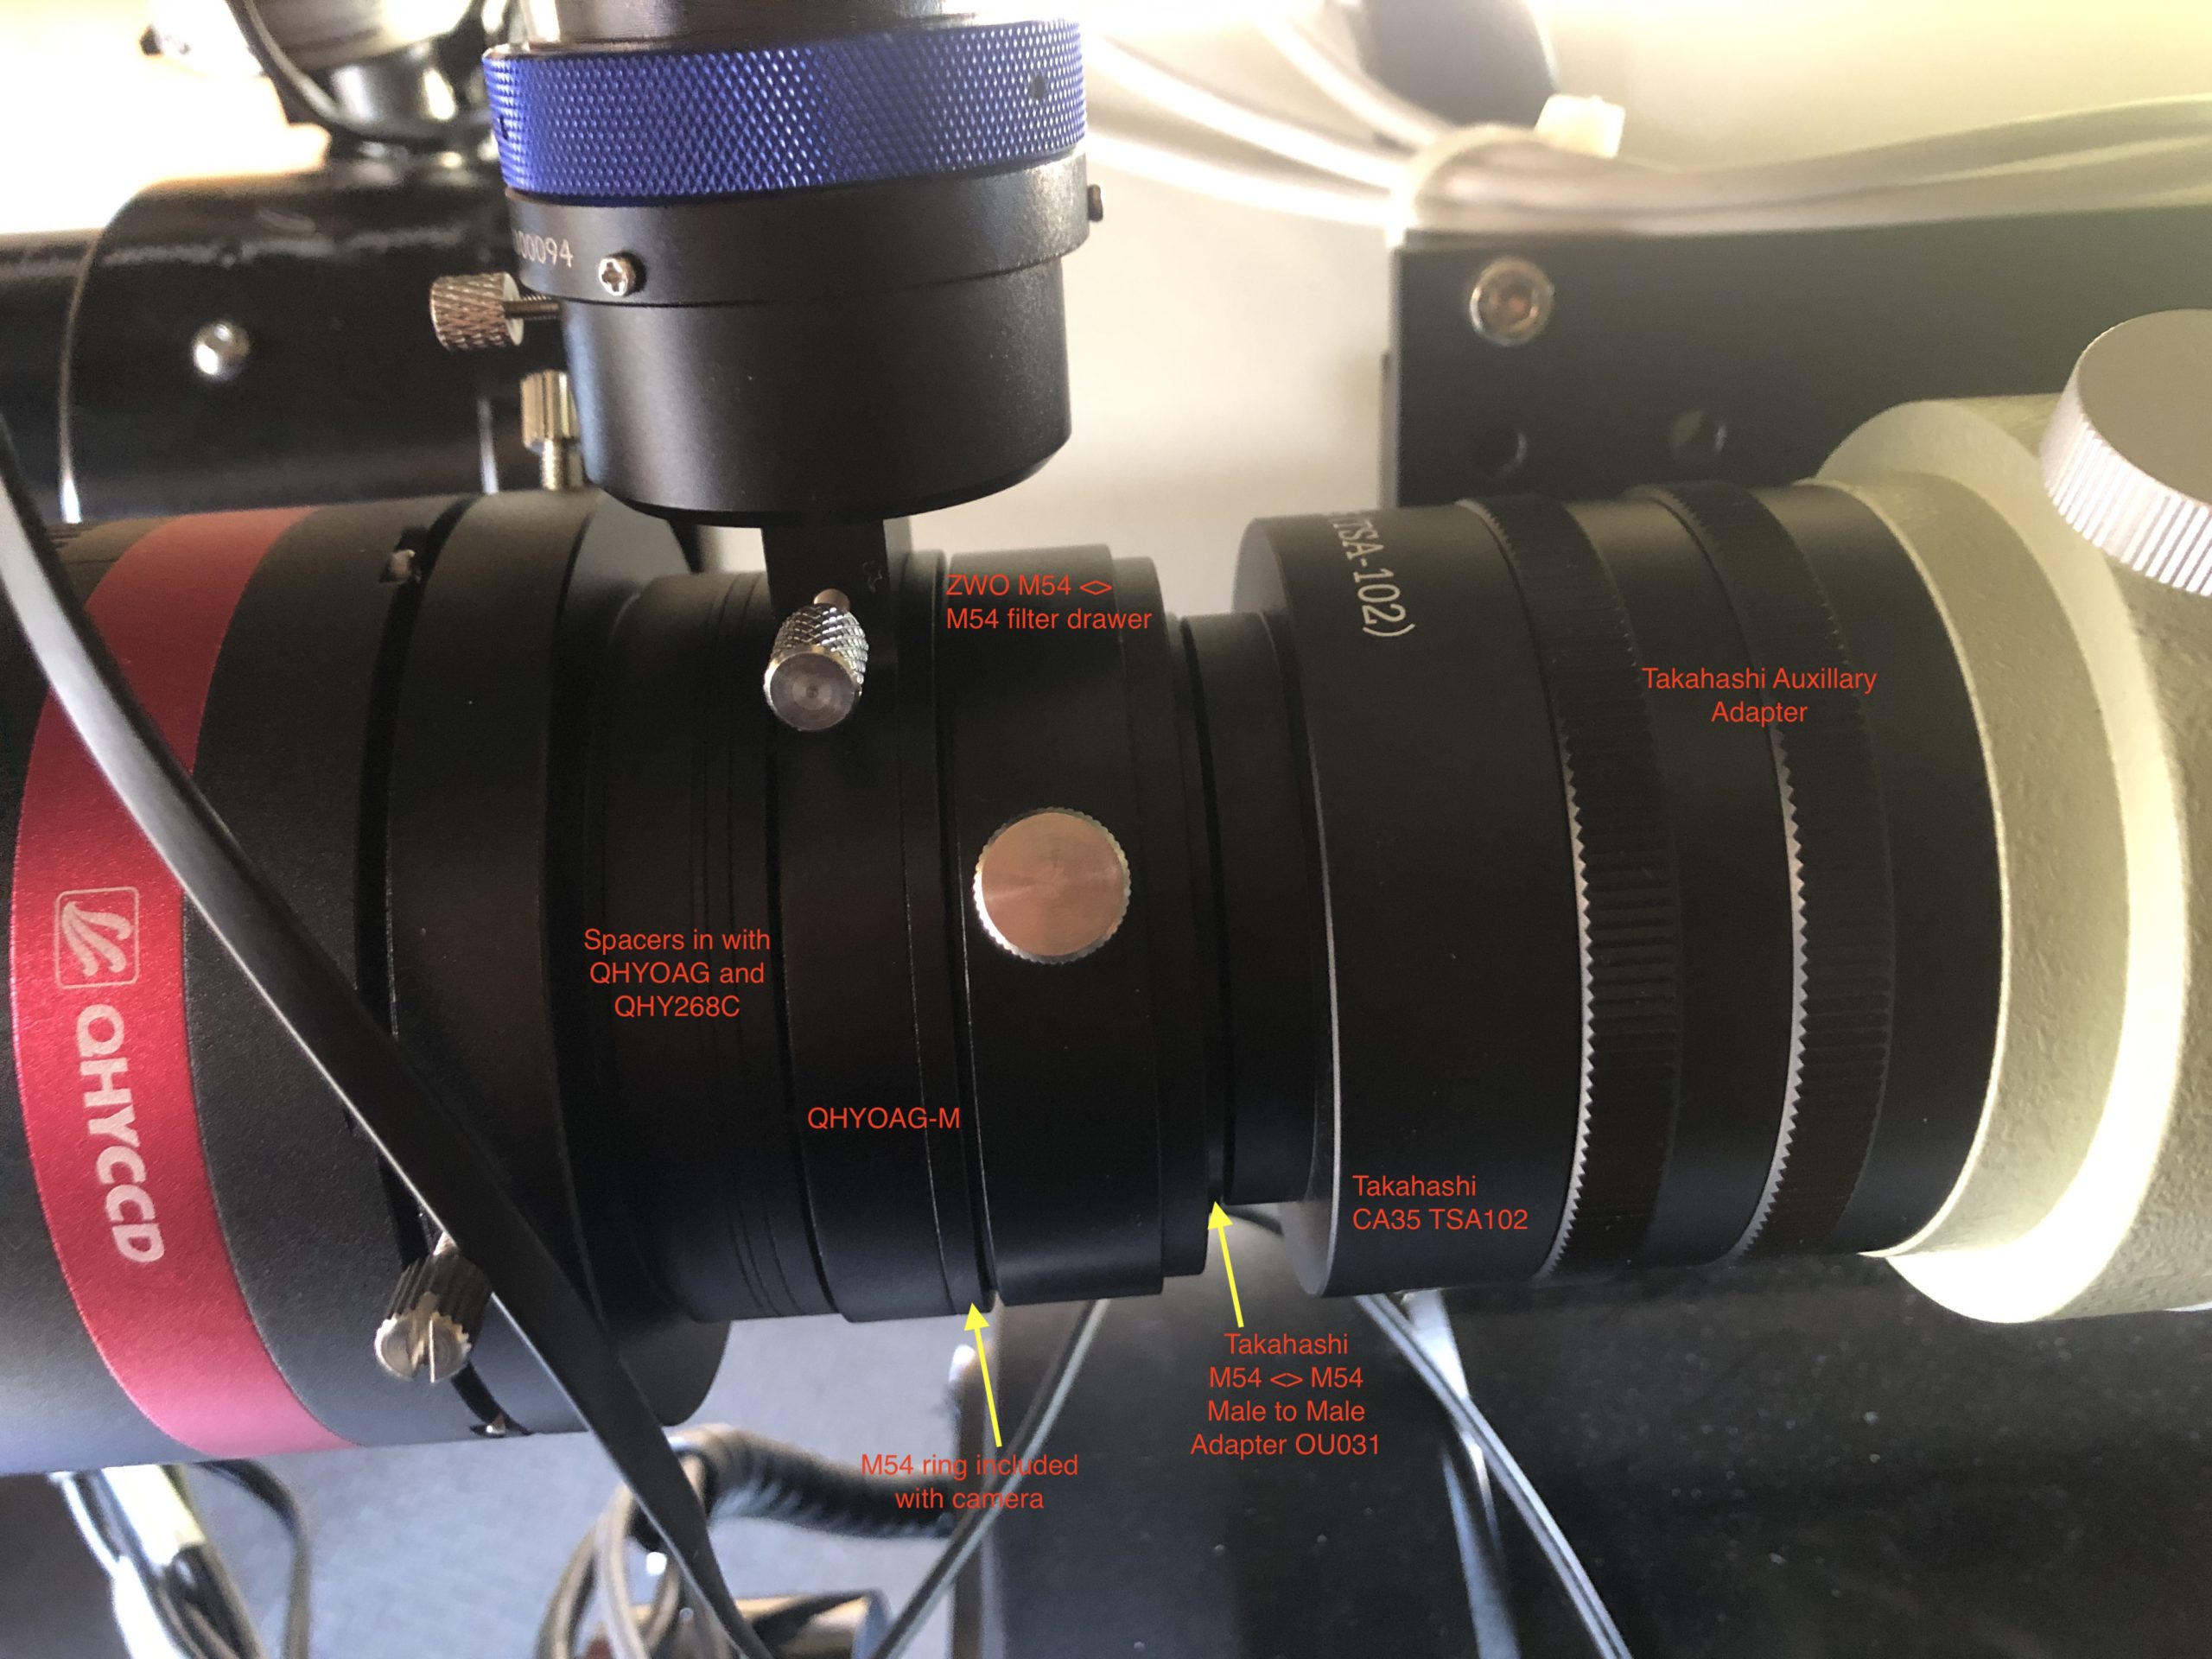
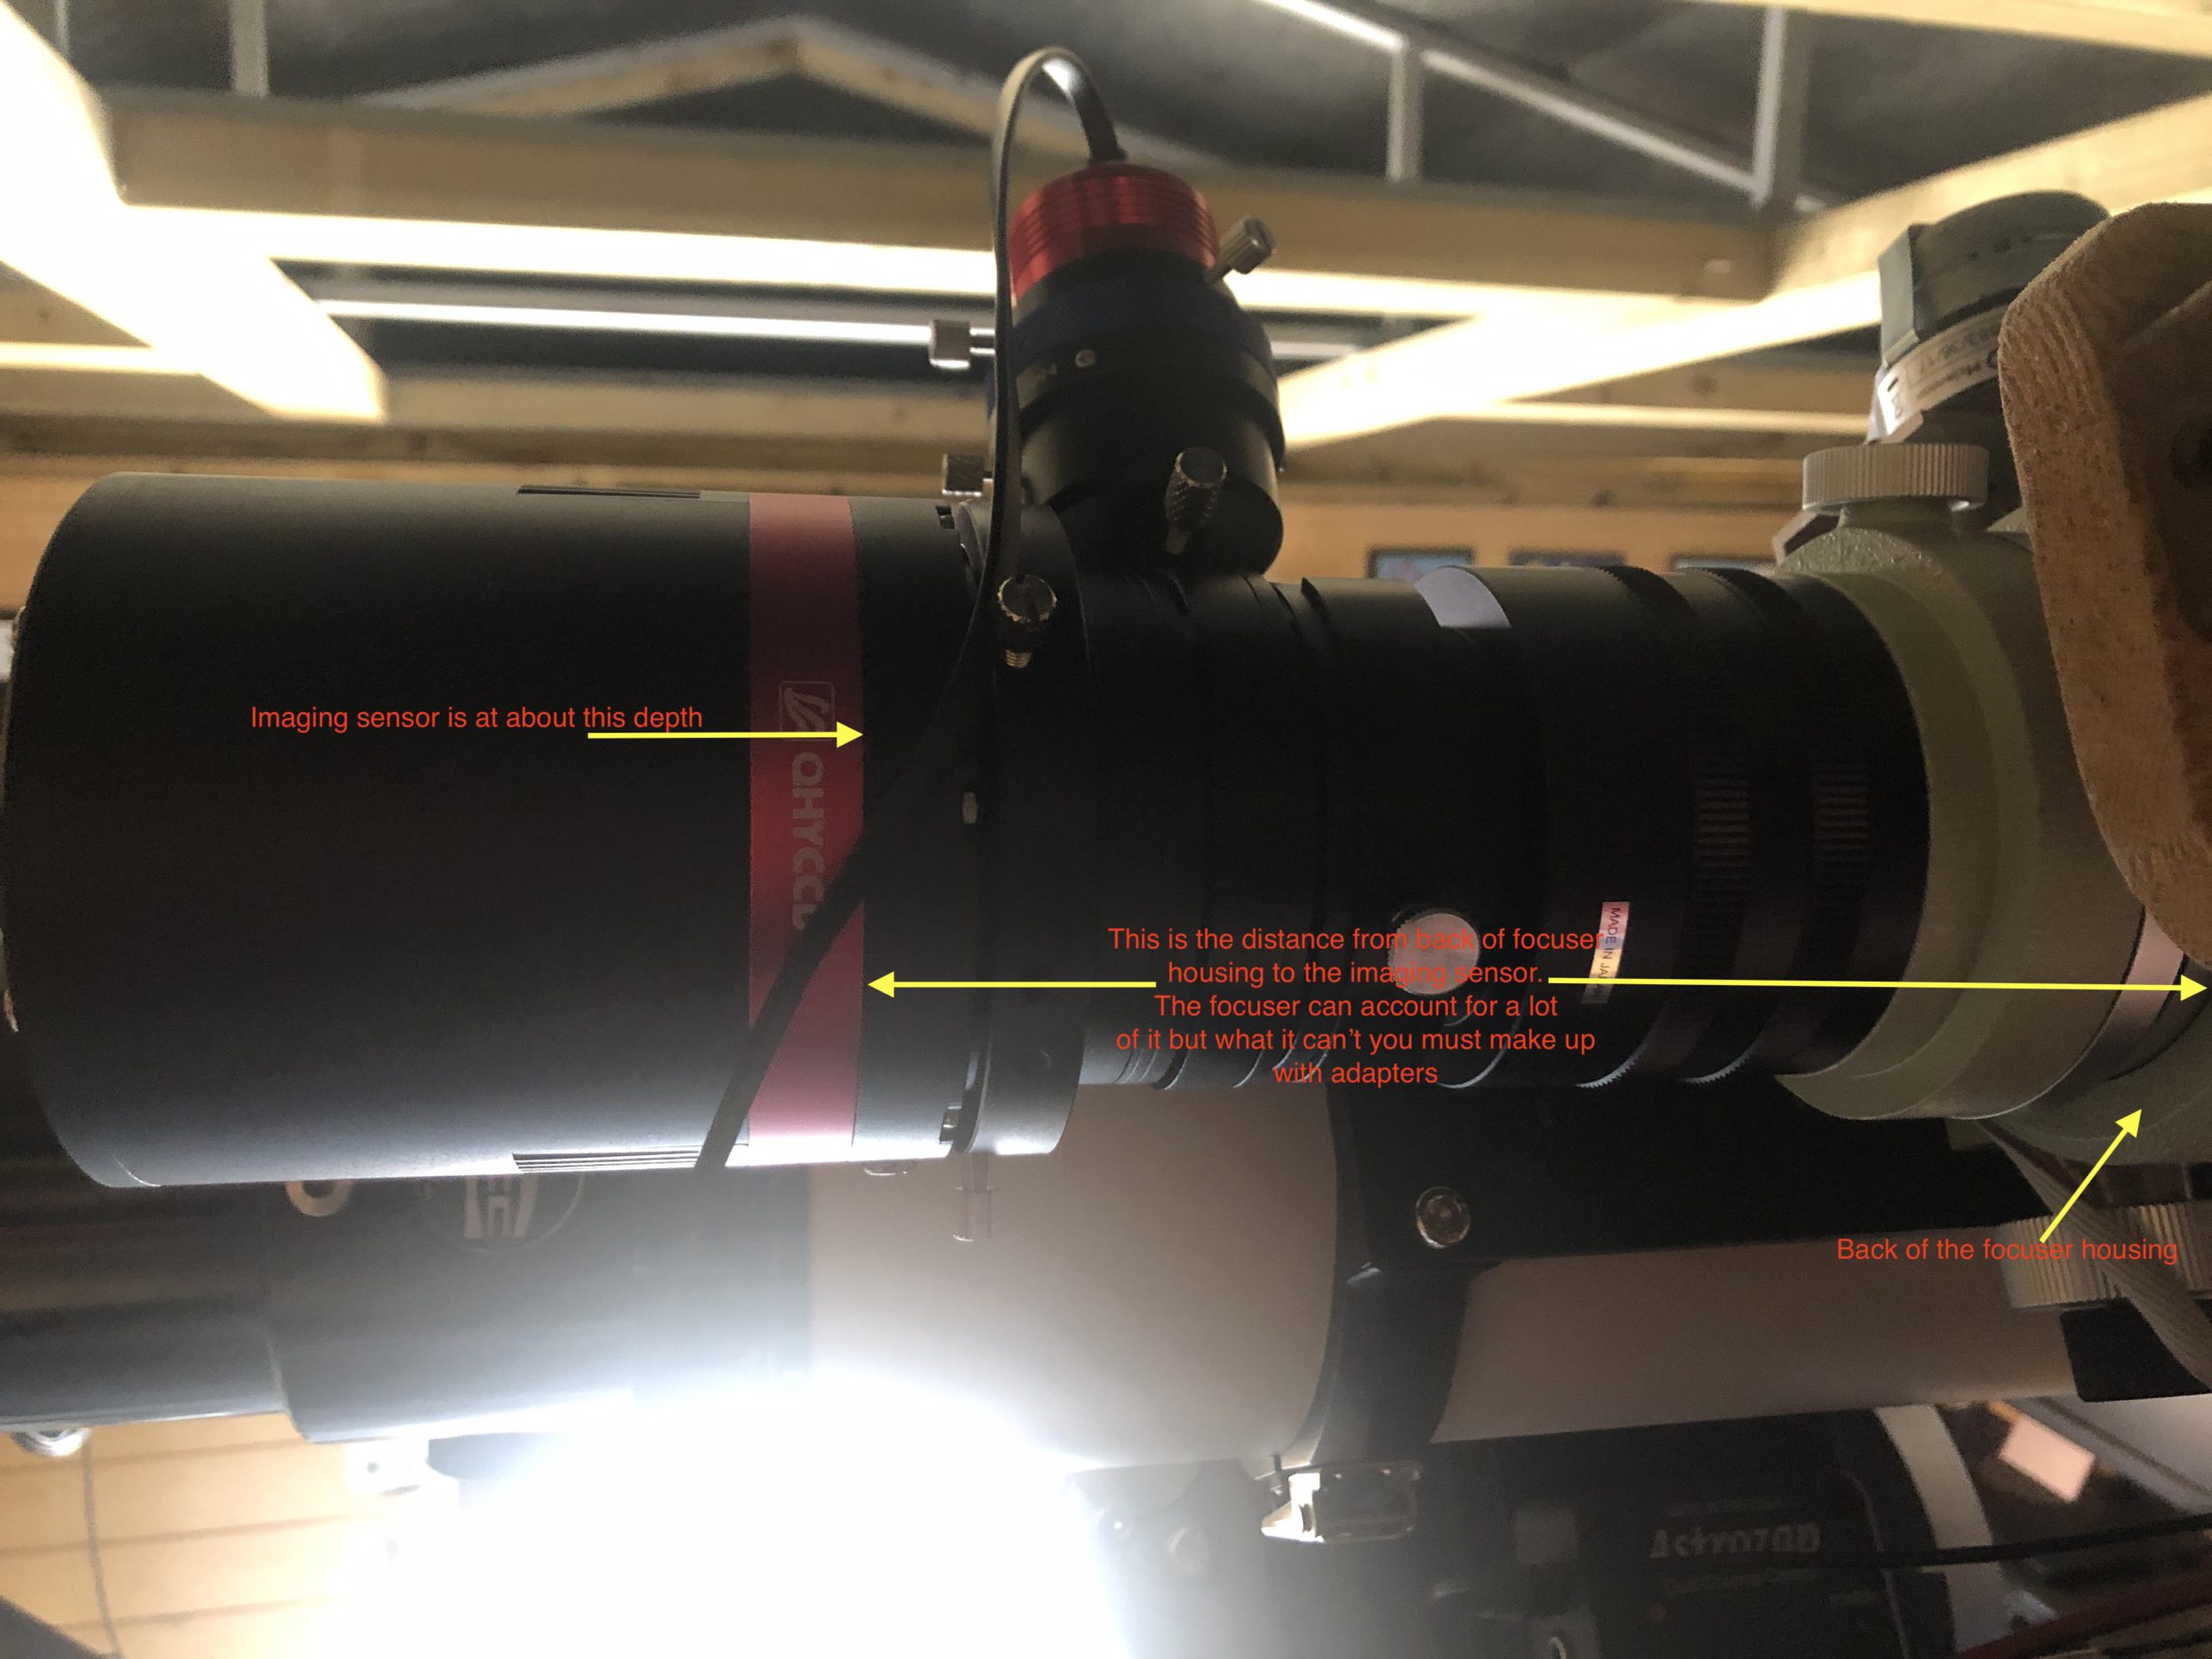
I need a way to be able to insert 2″ filters into the imaging train, as discussed above.  For sure, I’d always image in OSC with either a LDAS LP filter or a UV/IR cut filter in front of the camera.  But I might want to image with a filter such as the Optolong L-Extreme filter too.  This means whatever filter I use must be readily changeable when at the scope.  QHY supply a spacer with the QHY268C that has a thread for a 2″ filter and this can be used to space out the the OAG on the camera-side as discussed in my previous thread.  The problem with that method is that it makes the filter difficult to get access to and change, not impossible but tricky and awkward, certainly so at night when, for whaever reason, you change your mind and need to image soemthing different!   Another way is I could use a filter wheel between the OAG and the camera but I don’t want to spend another £300 on this and have another device needing power/USB.  So my thoughts were to use a filter drawer in front of the OAG. 

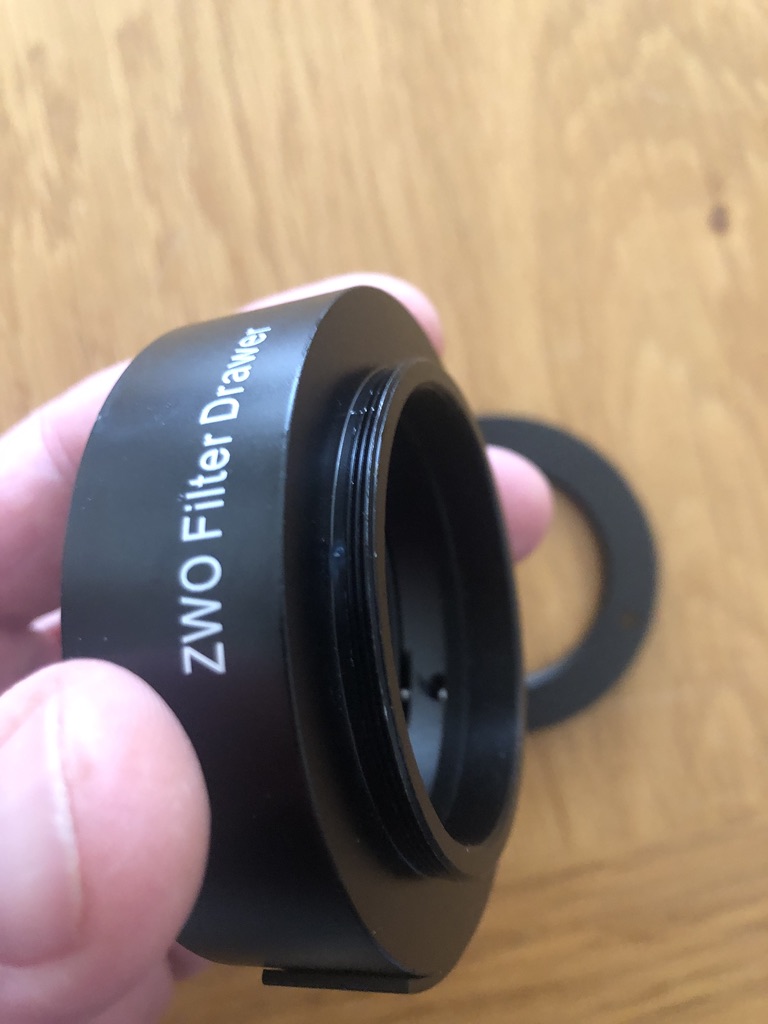
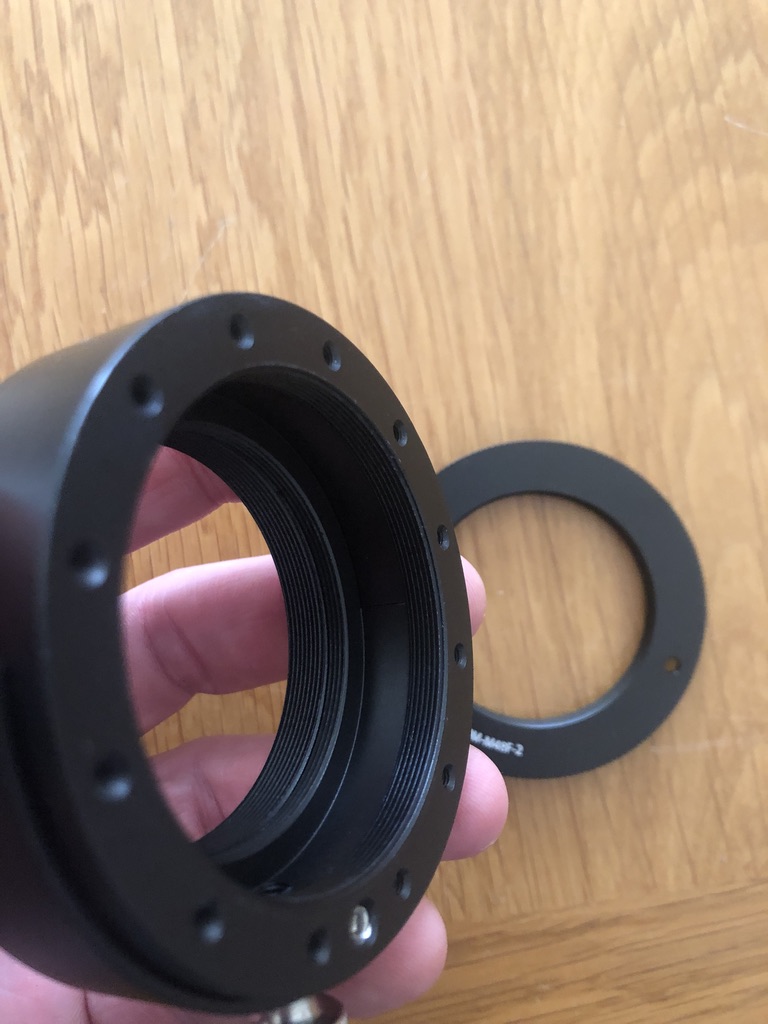
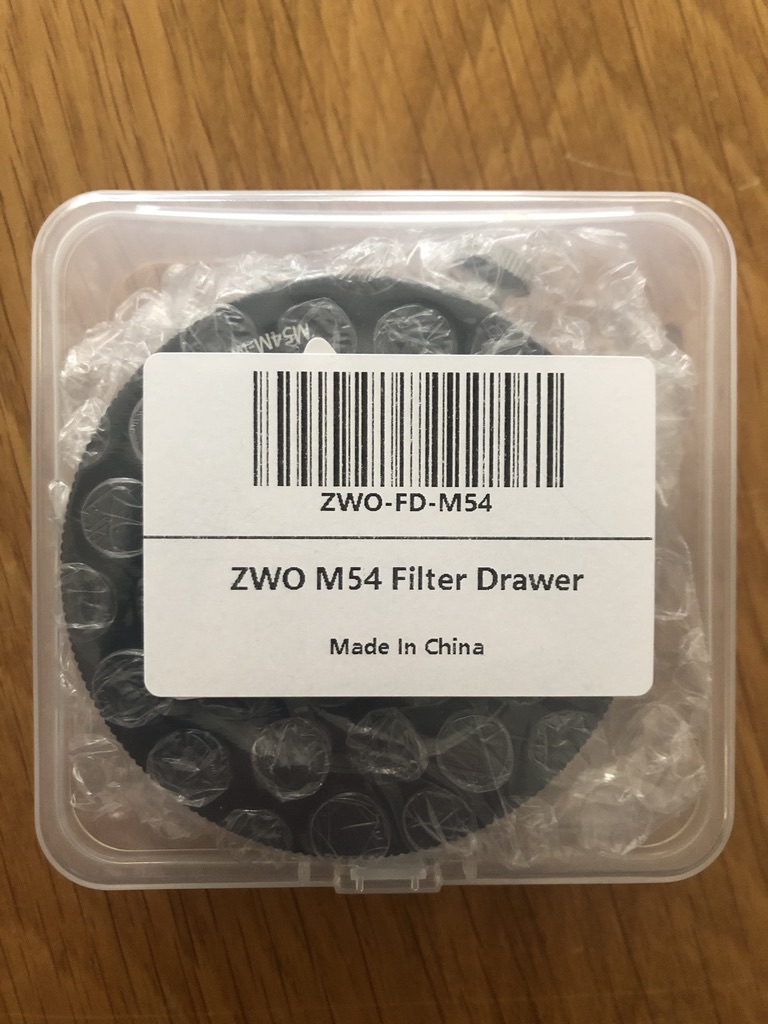
ZWO make a filter drawer (£75) with a 2″ compartment for filters and with M54 fitting scope and camera side.  I need the filter drawer to have two male M54 threads on either side ideally ideally so that it can mount with the QHY OAG mounting plate and also the CA35 – both of which expose a female M54 thread.  However, the ZWO is made with male M54 on one side and female M54 on the other, so I need to change the gender of one side 🙄.    Using a filter drawer like this in front of the OAG was a gamble in case I could not pick up guide stars through the filter.  More on that later…..

The filter drawer has a slide-in compartment with a strong magnetic catch to keep it secure.  The drawer is also provided with a very useful accessory; a M54 male step-down adapter to M48 female.  As it happens, the Williams Optics Redcat also has a male M48 on which to mount a camera. So this makes a perfect system and I can kill two birds with one stone.

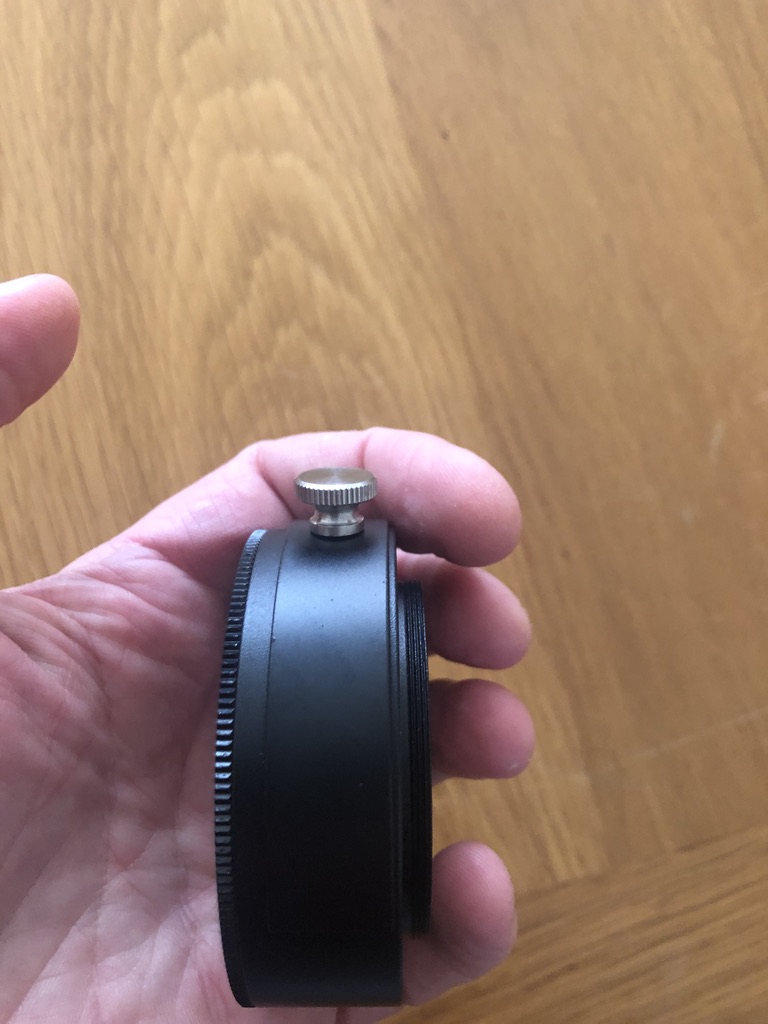
1.  If I mount the ZWO filter drawer with the M54 female side facing the telescope, then I can use an M54 male to M54 male gender change adapter (Takahashi OU031) to connect the female side of the filter drawer to the M54 female thread of the camera side of the CA35 Takahashi adapter.  The male side of the filter drawer then screws directly into the OAG.

2. If I want to mount the camera to the Redcat I remove the camera after the M54-M54 male-male adapter, install the screw-in ZWO supplied M54>M48F adapter and I can then mount the whole OAG/Camera/Filter drawer assembly to the Redcat 🙂  Additionally with this filter drawer it will connect onto my Samyang/Rokinon 135mm lens that I have modified slightly with this adapter.

The ZWO filter drawer also adds 24mm of back focus to get us to our goal of 200mm or so to get the cameras focused.

OU031 Takahashi Adapter
Takahashi OU031 Male to male M54 adapter
OU031 Takahashi Adapter packet
Takahashi Adapter in its packaging

The Takahashi OU031 adapter above joins the female side of the ZWO filter drawer to the female side of the CA35.  This simple adapter costs an astonishing £62 !  Other than make them myself I see little alternative other than to pay this exorbitant price.

The male (i.e. camera) side of the filter drawer screws into the M54 female telescope side of the OAG.

And there, we have a completely threaded mounting solution with QHY268C and the guidecam focused at the correct distance!

Will The Guidecam Focus ?

Clearly, the mechanism described has the filter drawer out in front of the OAG and the guidecam.  In other words, the guidecam must look through the filter to find a guide star.  This was a concern when I set up this arrangement, would guide stars show through? However, I can confirm that with a 2″ LDAS LP filter installed the guidecam picked up stars without any problem at all.  This will be by far my most predominant use-case for my QHY268C – 95% of the time I will be doing broadband.

Now, that said, I am interested in acquiring an Optolong L-extreme filter which only allows through some very specific narrowband emission lines.  It will remain to be seen if a guidestar can work with this filter drawer arrangement and if a guidestar can be seen through the L-Extreme filter.  If not, I will need to have a rethink and see if the L-extreme can be installed behind the OAG in some way on the occasions when I may want to capture narrowband through with this camera.

Update: 12 October 2020

The weather in the UK has been very cloudy and wet and since I authored this page and since then I have only had only snatched 15 minutes of clear sky time here and there; imaging in the UK is exceptionally challenging!  However, on 11th October I managed to build a picture from 47 subs.  Please see my first light post to read about this.  A sneak peek on the image below 🙂

Complete_OSC_NAN_smaller
QHY268C First Light

Update 2: 16 October 2020

I had an unexpected clear night, although the seeing was bad, and managed to get 55 x 4 minute subs of IC1396 – Elephant Trunk Nebula.

I think the camera is a good one and exciting times ahead with it hopefully 🙂

The Elephant Trunk Nebula
QHY268C and IC1396

Clear skies,  Steve

Comments are closed.